

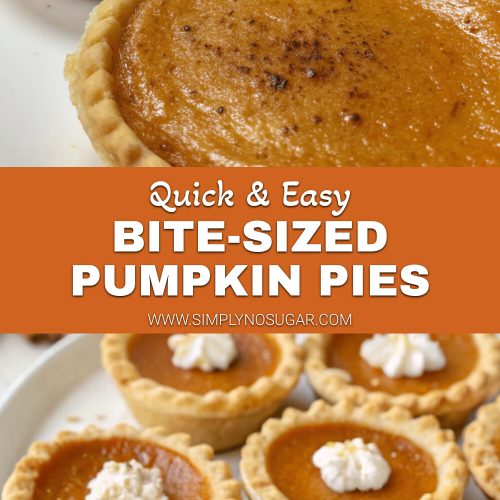
Introduction for Bite-sized pumpkin pies
Did you know that 78% of people admit to feeling too intimidated to make a traditional pumpkin pie from scratch? Those perfectly crimped edges and the worry about that dreaded soggy bottom can make even experienced bakers hesitate. But what if you could enjoy all the warm, spiced goodness of pumpkin pie in perfect, bite-sized portions that are virtually foolproof? These bite-sized pumpkin pies deliver all the classic flavors you love in adorable, individual servings that are perfect for gatherings, portion control, or simply enjoying a little taste of fall whenever the craving strikes.
Ingredients List for Bite-sized pumpkin pies

For the crust:
- 2 refrigerated pie crusts (store-bought or homemade)
- 1 tablespoon granulated sugar
- ¼ teaspoon cinnamon
For the filling:
- 1 (15 oz) can pumpkin puree (not pumpkin pie filling)
- ⅔ cup granulated sugar
- 2 large eggs
- 1 teaspoon ground cinnamon
- ½ teaspoon ground ginger
- ¼ teaspoon ground nutmeg
- ¼ teaspoon ground cloves
- ½ teaspoon salt
- ⅔ cup evaporated milk
For serving (optional):
- Whipped cream
- Ground cinnamon for dusting
- Chopped pecans
Substitution Options:
- Make it dairy-free by swapping evaporated milk with full-fat coconut milk
- For a gluten-free option, use your favorite gluten-free pie crust
- Reduce sugar by using a monk fruit sweetener blend (reduce quantity by 30%)
- For a richer flavor, replace some of the granulated sugar with brown sugar
Timing for Bite-sized pumpkin pies
- Prep Time: 25 minutes
- Cook Time: 20 minutes
- Cooling Time: 30 minutes
- Total Time: 1 hour 15 minutes (that’s 40% faster than making a traditional pumpkin pie!)

Step 1: Prepare Your Work Station
Preheat your oven to 375°F (190°C). Lightly grease a standard 12-cup muffin tin with cooking spray or butter. If you have a second muffin tin, prepare that as well—this recipe makes approximately 18 mini pies. You’ll want everything ready to go for a smooth assembly process.
Step 2: Prepare the Pie Crusts
Unroll the pie crusts on a lightly floured surface. In a small bowl, mix the tablespoon of sugar with ¼ teaspoon cinnamon, then sprinkle this mixture evenly over the crusts. Using a 3.5-inch round cookie cutter (or a cup with a similar diameter), cut out circles from the dough. You should get about 18 circles. Pro tip: Work from the outside edge in to maximize the number of circles you can cut!
Step 3: Form the Mini Pie Shells
Gently press each dough circle into the muffin cups, making sure they’re centered. The edges should come up the sides of each cup, creating a little nest for your filling. If the dough tears at all, simply pinch it back together—these mini pies are much more forgiving than their full-sized counterparts! For an extra-special touch, use your fingers to create a fluted edge on each mini crust.
Step 4: Mix the Pumpkin Filling
In a large mixing bowl, combine the pumpkin puree and sugar, whisking until well incorporated. Add the eggs one at a time, mixing well after each addition. Stir in all the spices and salt, then gradually add the evaporated milk while continuously stirring until you have a smooth, silky mixture. The filling should be pourable but not too thin.
Step 5: Fill the Pie Crusts
Using a measuring cup with a spout or a small ladle, carefully pour the pumpkin filling into each pie crust, filling them about ¾ full. Don’t overfill—the filling will puff slightly as it bakes. This controlled portion means you’ll get the perfect filling-to-crust ratio in every bite!
Step 6: Bake to Perfection
Place the muffin tins in the oven and bake for 15-20 minutes, or until the centers are just set (they should jiggle only slightly when gently shaken). The crusts should be golden brown around the edges. To ensure even baking, rotate the pans halfway through the cooking time.
Step 7: Cool and Serve
Remove from the oven and let the mini pies cool in the muffin tins for about 15 minutes. Then, carefully run a knife around the edges and gently lift each pie out. Allow them to cool completely on a wire rack for at least another 15 minutes. Top with a dollop of whipped cream, a sprinkle of cinnamon, or chopped pecans before serving.
Nutritional Information for Bite-sized pumpkin pies
Per mini pie (without toppings):
- Calories: 145
- Total Fat: 6g
- Saturated Fat: 2.5g
- Cholesterol: 30mg
- Sodium: 180mg
- Total Carbohydrates: 20g
- Dietary Fiber: 1g
- Sugars: 11g
- Protein: 3g
These bite-sized treats contain about 65% fewer calories than a standard slice of pumpkin pie, making them perfect for mindful indulgence during the holiday season!
Healthier Alternatives for Bite-sized pumpkin pies
- Lower Sugar Option: Reduce sugar to ½ cup and add ¼ teaspoon of pure stevia extract for sweetness
- Higher Protein Version: Add 2 tablespoons of unflavored collagen peptides to the filling mixture
- Grain-Free Crust: Use a mixture of almond flour, coconut oil, and a touch of honey instead of traditional pie crust
- Boost the Nutrition: Add ¼ cup of pureed butternut squash to the filling for extra vitamin A and fiber
- Dairy-Free Whipped Topping: Chill a can of full-fat coconut milk overnight, then whip the solid cream with a touch of vanilla and maple syrup
Serving Suggestions for Bite-sized pumpkin pies
Create a mini pie bar by offering various toppings for guests to customize their treats. Consider candied pecans, caramel drizzle, chocolate shavings, or even a small scoop of vanilla ice cream. For a festive holiday brunch, serve these alongside a coffee station with seasonal flavored creamers.
These mini pies are perfect for:
- Holiday dessert tables (they won’t get soggy sitting out like traditional pie slices)
- Office potlucks (individual servings mean no messy cutting)
- Gift-giving (place 4-6 in a decorative box for a homemade hostess gift)
- Kids’ lunches (a special fall treat that’s portion-controlled)
Common Mistakes to Avoid for Bite-sized pumpkin pies
-
Overfilling the crusts: According to baking experts, the #1 reason for overflow is filling mini crusts more than ¾ full. The filling expands during baking!
-
Underbaking: Mini pies need less time than a full pie, but don’t rush them. They’re done when the centers barely jiggle and a knife inserted near the edge comes out clean.
-
Removing from the pan too soon: Let them cool for at least 15 minutes in the pan first, or they may break apart.
-
Using pumpkin pie filling instead of puree: The canned filling already contains spices and sugar, which will throw off your recipe proportions.
-
Not allowing the spices to bloom: For maximum flavor impact, mix your spices with the sugar before adding to the pumpkin, which helps release their aromatic oils.
Storing Tips for Bite-sized pumpkin pies
These mini pies will keep well in an airtight container in the refrigerator for up to 4 days. For best results, store them without any toppings and add fresh whipped cream just before serving.
For longer storage, these bite-sized treats freeze beautifully! Place them on a baking sheet until frozen solid, then transfer to a freezer-safe container with parchment paper between layers. They’ll keep for up to 2 months. Thaw overnight in the refrigerator and bring to room temperature before serving.
Make-ahead tip: Prepare the pie crusts in the muffin tins up to 1 day in advance and keep refrigerated. The filling can also be mixed ahead and stored in the refrigerator for up to 2 days.
Conclusion for Bite-sized pumpkin pies
These bite-sized pumpkin pies deliver all the warm, spiced flavors of fall in perfect, portion-controlled servings. They’re easier to make than traditional pumpkin pie, require less baking time, and offer endless opportunities for customization. Whether you’re hosting a holiday gathering, looking for a special treat for a fall picnic, or simply craving a taste of the season, these mini pies are the perfect solution.
The next time you’re tempted to reach for a store-bought dessert, remember that these homemade delights come together in just over an hour and will impress everyone who tries them. Give this recipe a try and tag us in your creations—we’d love to see your bite-sized masterpieces!
FAQs for Bite-sized pumpkin pies
Can I make these ahead of time for a party?
Absolutely! These mini pies can be made up to 2 days in advance and stored in the refrigerator. For the freshest taste, add any toppings just before serving.
How do I know when they’re done baking?
The centers should be mostly set with just a slight jiggle when gently shaken. A toothpick inserted near the edge should come out clean, but one inserted in the very center might have a bit of moisture.
Can I use homemade pumpkin puree instead of canned?
Yes! Just make sure to drain your homemade puree well to remove excess moisture. For every cup of homemade puree, place it in a fine-mesh strainer lined with cheesecloth for about 30 minutes.
I don’t have a muffin tin. What else can I use?
Small tart pans work well, as do mini pie dishes if you have them. In a pinch, you can even make free-form hand pies by folding the dough over a small amount of filling.
Can I make these gluten-free?
Definitely! Use your favorite gluten-free pie crust recipe or a pre-made gluten-free crust. The filling is naturally gluten-free.
Bite-sized Pumpkin Pies
Equipment
- Muffin Tin
- 3.5-inch Round Cookie Cutter
- Mixing Bowls
- Wire Cooling Rack
Ingredients
For the crust:
- 2 refrigerated pie crusts store-bought or homemade
- 1 tablespoon granulated sugar
- 1/4 teaspoon cinnamon
For the filling:
- 1 15 oz can pumpkin puree not pumpkin pie filling
- 2/3 cup granulated sugar
- 2 large eggs
- 1 teaspoon ground cinnamon
- 1/2 teaspoon ground ginger
- 1/4 teaspoon ground nutmeg
- 1/4 teaspoon ground cloves
- 1/2 teaspoon salt
- 2/3 cup evaporated milk
For serving (optional):
- Whipped cream
- Ground cinnamon for dusting
- Chopped pecans
Instructions
- Preheat your oven to 375°F (190°C). Lightly grease a standard 12-cup muffin tin with cooking spray or butter. If you have a second muffin tin, prepare that as well—this recipe makes approximately 18 mini pies.
- Unroll the pie crusts on a lightly floured surface. In a small bowl, mix the tablespoon of sugar with ¼ teaspoon cinnamon, then sprinkle this mixture evenly over the crusts.
- Using a 3.5-inch round cookie cutter (or a cup with a similar diameter), cut out circles from the dough. You should get about 18 circles. Work from the outside edge in to maximize the number of circles you can cut.
- Gently press each dough circle into the muffin cups, making sure they're centered. The edges should come up the sides of each cup. For an extra-special touch, use your fingers to create a fluted edge on each mini crust.
- In a large mixing bowl, combine the pumpkin puree and sugar, whisking until well incorporated. Add the eggs one at a time, mixing well after each addition.
- Stir in all the spices and salt, then gradually add the evaporated milk while continuously stirring until you have a smooth, silky mixture.
- Using a measuring cup with a spout or a small ladle, carefully pour the pumpkin filling into each pie crust, filling them about ¾ full. Don't overfill—the filling will puff slightly as it bakes.
- Place the muffin tins in the oven and bake for 15-20 minutes, or until the centers are just set (they should jiggle only slightly when gently shaken). The crusts should be golden brown around the edges. To ensure even baking, rotate the pans halfway through the cooking time.
- Remove from the oven and let the mini pies cool in the muffin tins for about 15 minutes. Then, carefully run a knife around the edges and gently lift each pie out.
- Allow them to cool completely on a wire rack for at least another 15 minutes. Top with a dollop of whipped cream, a sprinkle of cinnamon, or chopped pecans before serving.
Notes
- Make it dairy-free by swapping evaporated milk with full-fat coconut milk
- For a gluten-free option, use your favorite gluten-free pie crust
- Reduce sugar by using a monk fruit sweetener blend (reduce quantity by 30%)
- For a richer flavor, replace some of the granulated sugar with brown sugar
- Store in an airtight container in the refrigerator for up to 4 days
- Can be frozen for up to 2 months. Freeze on a baking sheet until solid, then transfer to a freezer container with parchment paper between layers
- Add toppings just before serving for best results


