

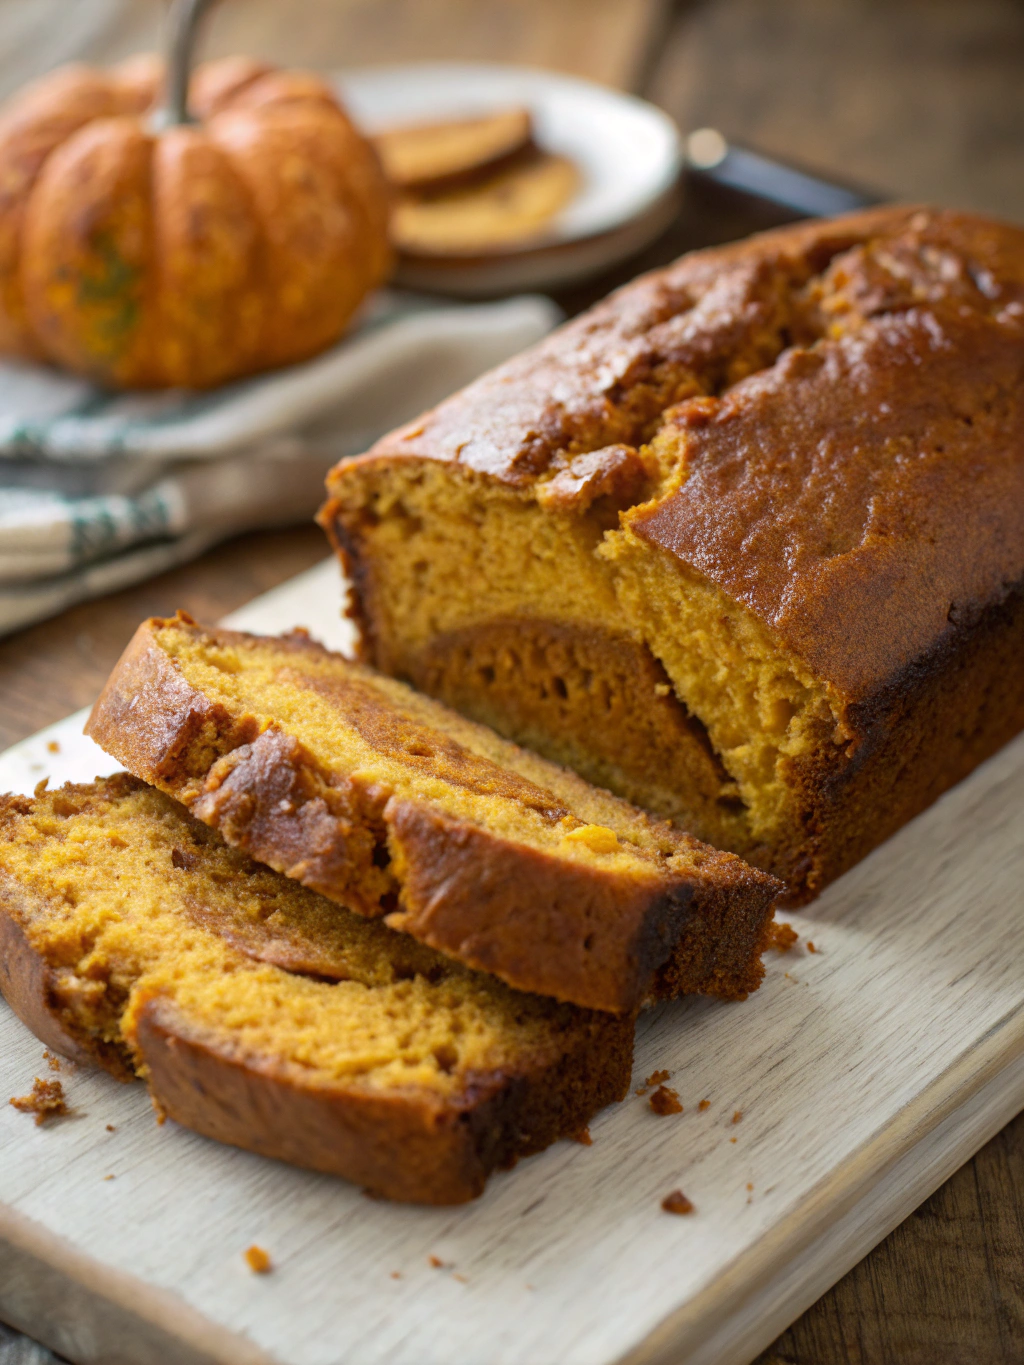
Introduction for Japanese Pumpkin Bread
Did you know that Japanese milk bread techniques can increase the shelf life of homemade bread by up to 3 days longer than traditional Western methods? This remarkable difference comes from the game-changing tangzhong method—a technique that transforms ordinary bread into clouds of pillowy perfection. Today, we’re elevating this Japanese baking tradition by incorporating sweet, nutty kabocha squash into an ultra-soft Japanese pumpkin bread that will revolutionize your baking repertoire.
This Japanese pumpkin bread (also known as kabocha milk bread) combines the renowned softness of Asian-style bread with the earthy sweetness of kabocha squash. The result is a delicately flavored, incredibly tender loaf that maintains its softness for days—if it lasts that long in your kitchen!
Ingredients List for Japanese Pumpkin Bread
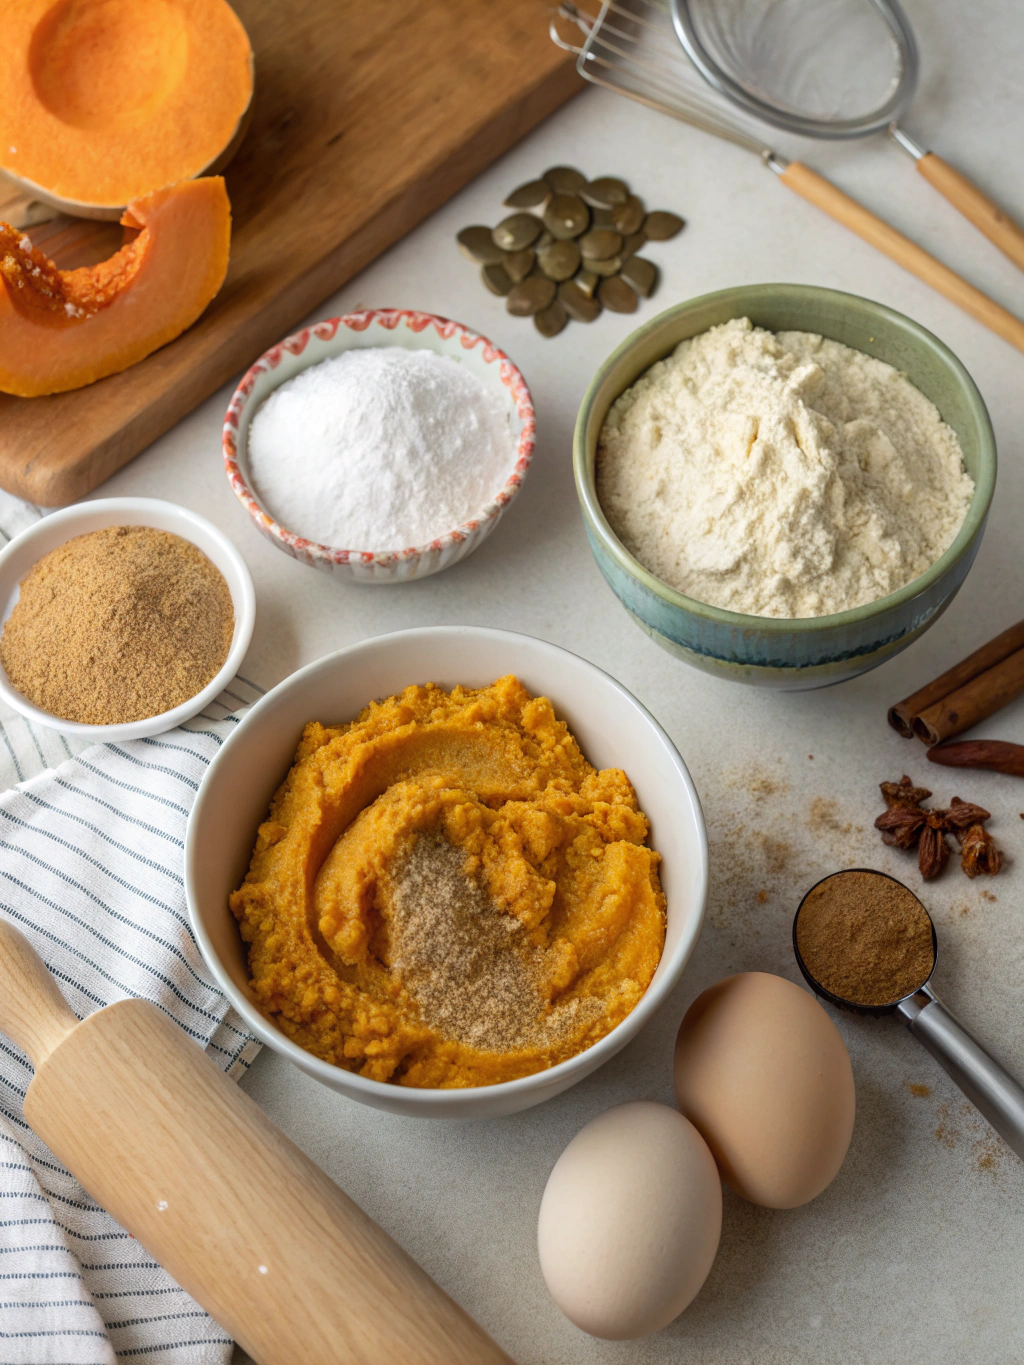
For the Tangzhong (starter):
- 3 tablespoons (25g) bread flour
- ½ cup (120ml) whole milk
- Substitute option: Plant-based milk works well for dairy-free versions
For the Kabocha Purée:
- 1 cup (240g) steamed and mashed kabocha squash
- Substitute option: Butternut squash or sweet potato can work, though the flavor profile will be slightly different
For the Dough:
- 2½ cups (320g) bread flour
- ¼ cup (50g) granulated sugar
- 1 teaspoon salt
- 2¼ teaspoons (1 packet) active dry yeast
- 1 large egg, room temperature
- ¼ cup (60ml) milk, warm
- 3 tablespoons (42g) unsalted butter, softened
- 1 tablespoon honey or maple syrup
For the Glaze (Optional):
- 1 tablespoon melted butter
- 1 teaspoon honey
Timing for Japanese Pumpkin Bread
- Preparation Time: 30 minutes (including making tangzhong and kabocha purée)
- Rising Time: 2 hours (25% less if using a proofing setting on your oven)
- Baking Time: 35-40 minutes
- Total Time: Approximately 3 hours 10 minutes
- Active Working Time: Only 45 minutes (the rest is hands-off waiting)
Step 1: Prepare the Tangzhong
Whisk the bread flour and milk in a small saucepan until no lumps remain. Heat over medium-low, stirring constantly until the mixture thickens to a paste (around 65°C/149°F if you have a thermometer). The consistency should resemble thick pudding and coat the back of a spoon. Transfer to a small bowl and cover with plastic wrap directly touching the surface to prevent a skin from forming. Let cool to room temperature.
Step 2: Prepare the Kabocha Purée
Steam kabocha squash pieces until fork-tender (about 15 minutes). Remove the skin and mash until smooth. For ultra-silky results, process in a food processor or push through a fine-mesh sieve. Allow to cool completely before using, as hot purée can kill the yeast.
Step 3: Activate the Yeast
In a small bowl, combine the warm milk (around 110°F/43°C) with 1 teaspoon of the sugar and sprinkle the yeast on top. Let stand for 5-10 minutes until foamy and fragrant. If your mixture doesn’t foam up, your yeast might be inactive—start fresh with new yeast.
Step 4: Make the Dough
In the bowl of a stand mixer fitted with a dough hook, combine the remaining sugar, flour, and salt. Create a well in the center and add the cooled tangzhong, kabocha purée, activated yeast mixture, egg, and honey. Mix on low speed until roughly combined (about 2 minutes), then increase to medium-low and knead for 5 minutes until a rough dough forms.
Step 5: Incorporate the Butter
Add the softened butter in small pieces while the mixer runs on medium-low speed. Once all butter is added, increase to medium speed and knead for 7-10 minutes until the dough becomes smooth, elastic, and passes the windowpane test (when stretched, it should form a thin membrane without tearing).
Step 6: First Rise
Shape the dough into a ball and place in a lightly greased bowl. Cover with plastic wrap or a damp kitchen towel and let rise in a warm spot until doubled in size (about 60-90 minutes). For optimal results, aim for a warm environment around 75-80°F (24-27°C).
Step 7: Shape the Loaf
Gently punch down the dough to release air bubbles. On a lightly floured surface, divide the dough into three equal portions. Shape each portion into a ball, then roll each ball into an oval about 8 inches long. Fold the oval into thirds like a letter, then roll it out to about a 10-inch rectangle. Roll up the rectangle tightly from the short end, creating a small log. Place the three logs, seam side down, in a greased 9×5-inch loaf pan.
Step 8: Second Rise
Cover the pan loosely with plastic wrap or a damp kitchen towel and let rise until the dough reaches about 1 inch above the rim of the pan (approximately 45-60 minutes).
Step 9: Bake
Preheat your oven to 350°F (175°C). Bake the bread for 35-40 minutes until golden brown on top and the internal temperature reaches 190°F (88°C). If the top browns too quickly, tent with aluminum foil halfway through baking.
Step 10: Finish and Cool
Immediately brush the hot bread with the optional glaze for a beautiful shine and extra flavor. Remove from the pan after 5 minutes and cool completely on a wire rack before slicing to allow the structure to set fully.
Nutritional Information for Japanese Pumpkin Bread
Per slice (assuming 12 slices per loaf):
- Calories: 165
- Carbohydrates: 28g
- Protein: 5g
- Fat: 4g
- Fiber: 1.5g
- Sugar: 6g
- Vitamin A: 35% DV (thanks to the kabocha)
- Potassium: 8% DV
Healthier Alternatives for Japanese Pumpkin Bread
- Reduce Sugar: Cut sugar to 3 tablespoons without affecting the bread’s texture
- Whole Grain Option: Replace up to 40% of the bread flour with whole wheat flour (add 1 extra tablespoon of milk to maintain moisture)
- Dairy-Free Version: Use plant-based milk and vegan butter (oat milk works particularly well for its natural sweetness)
- Lower Fat: Replace half the butter with unsweetened applesauce for a 25% reduction in fat content
Serving Suggestions for Japanese Pumpkin Bread
- Toast slices lightly and spread with cultured butter and a sprinkle of flaky sea salt
- Use as a base for Japanese-style sandwiches (sando) with egg salad and thin cucumber slices
- Create an elevated breakfast by topping with whipped ricotta, honey, and toasted pumpkin seeds
- Serve alongside miso soup and a simple salad for a light but satisfying meal
- Transform day-old bread into extraordinary French toast with a cinnamon-ginger batter
Common Mistakes to Avoid for Japanese Pumpkin Bread
- Skipping the Tangzhong: This critical step is what gives the bread its signature softness—don’t bypass it! Studies show tangzhong can increase moisture retention by up to 30%.
- Using Cold Ingredients: Room temperature ingredients incorporate more effectively. Cold eggs or milk can inhibit yeast activity by up to 40%.
- Rushing the Rise: Under-proofed dough creates dense bread. Be patient and look for visual cues (doubled size) rather than strictly following timing.
- Cutting Hot Bread: Wait at least 1 hour before slicing to prevent the texture from becoming gummy (internal steam needs to redistribute properly).
- Incorrect Oven Temperature: An oven thermometer reveals most home ovens are off by 25°F. Verify your temperature for consistent results.
Storing Tips for Japanese Pumpkin Bread
- Store at room temperature in an airtight container or bread bag for 3-4 days
- For longer storage, slice the cooled bread completely and freeze with parchment paper between slices
- Frozen slices can be toasted directly from frozen—no need to thaw first
- To refresh day-old bread, sprinkle with water and warm in a 300°F oven for 5-7 minutes
- Never refrigerate this bread as refrigeration accelerates starch retrogradation, making it go stale 3x faster
Conclusion for Japanese Pumpkin Bread
This Japanese pumpkin bread represents the beautiful fusion of traditional technique with seasonal ingredients. The tangzhong method transforms ordinary bread flour into an exceptionally soft, long-lasting loaf, while kabocha squash adds nutritional benefits and a subtle, natural sweetness. Whether you’re new to Asian-inspired baking or a seasoned bread maker, this recipe offers both technique and flavor that will elevate your bread game.
Try this recipe this weekend and experience the pillow-soft texture that makes Japanese milk bread so legendary—with the added bonus of nutritious kabocha! Share your baking journey with us in the comments, and don’t forget to tag your creations on social media.
FAQs for Japanese Pumpkin Bread
Q: Can I make this bread without a stand mixer?
A: Absolutely! While a stand mixer makes the process easier, you can knead by hand for 10-12 minutes until you achieve the same smooth, elastic texture.
Q: Why is my dough too sticky to work with?
A: Kabocha moisture content varies. If your dough is too sticky, add flour 1 tablespoon at a time during kneading. Conversely, if it’s too dry, add milk 1 teaspoon at a time.
Q: Can I make this bread ahead of time?
A: Yes! You can refrigerate the dough after the first rise for up to 24 hours. Let it come to room temperature for 30 minutes before shaping.
Q: What makes Japanese milk bread different from regular bread?
A: The tangzhong method pre-gelatinizes some of the starches, allowing the bread to hold more moisture without becoming heavy, resulting in a uniquely tender texture that stays fresh longer.
Q: Can I add other flavors to this bread?
A: Certainly! Try adding 1 teaspoon of cinnamon, ½ teaspoon of nutmeg, or 1 tablespoon of black sesame seeds for complementary flavor variations.

Japanese Pumpkin Bread (Kabocha Milk Bread)
Equipment
- Stand Mixer with Dough Hook
- 9×5-inch loaf pan
- Small Saucepan
- Wire Cooling Rack
Ingredients
For the Tangzhong (starter)
- 3 tablespoons bread flour (25g)
- 1/2 cup whole milk (120ml, plant-based milk works for dairy-free)
For the Kabocha Purée
- 1 cup steamed and mashed kabocha squash (240g, butternut squash or sweet potato can substitute)
For the Dough
- 2 1/2 cups bread flour (320g)
- 1/4 cup granulated sugar (50g)
- 1 teaspoon salt
- 2 1/4 teaspoons active dry yeast (1 packet)
- 1 large egg room temperature
- 1/4 cup milk warm (60ml)
- 3 tablespoons unsalted butter softened (42g)
- 1 tablespoon honey or maple syrup
For the Glaze (Optional)
- 1 tablespoon butter melted
- 1 teaspoon honey
Instructions
- Whisk the bread flour and milk in a small saucepan until no lumps remain. Heat over medium-low, stirring constantly until the mixture thickens to a paste (around 65°C/149°F if you have a thermometer). The consistency should resemble thick pudding and coat the back of a spoon. Transfer to a small bowl and cover with plastic wrap directly touching the surface to prevent a skin from forming. Let cool to room temperature.
- Steam kabocha squash pieces until fork-tender (about 15 minutes). Remove the skin and mash until smooth. For ultra-silky results, process in a food processor or push through a fine-mesh sieve. Allow to cool completely before using.
- In a small bowl, combine the warm milk (around 110°F/43°C) with 1 teaspoon of the sugar and sprinkle the yeast on top. Let stand for 5-10 minutes until foamy and fragrant.
- In the bowl of a stand mixer fitted with a dough hook, combine the remaining sugar, flour, and salt. Create a well in the center and add the cooled tangzhong, kabocha purée, activated yeast mixture, egg, and honey. Mix on low speed until roughly combined (about 2 minutes), then increase to medium-low and knead for 5 minutes until a rough dough forms.
- Add the softened butter in small pieces while the mixer runs on medium-low speed. Once all butter is added, increase to medium speed and knead for 7-10 minutes until the dough becomes smooth, elastic, and passes the windowpane test (when stretched, it should form a thin membrane without tearing).
- Shape the dough into a ball and place in a lightly greased bowl. Cover with plastic wrap or a damp kitchen towel and let rise in a warm spot until doubled in size (about 60-90 minutes).
- Gently punch down the dough to release air bubbles. On a lightly floured surface, divide the dough into three equal portions. Shape each portion into a ball, then roll each ball into an oval about 8 inches long. Fold the oval into thirds like a letter, then roll it out to about a 10-inch rectangle. Roll up the rectangle tightly from the short end, creating a small log. Place the three logs, seam side down, in a greased 9×5-inch loaf pan.
- Cover the pan loosely with plastic wrap or a damp kitchen towel and let rise until the dough reaches about 1 inch above the rim of the pan (approximately 45-60 minutes).
- Preheat your oven to 350°F (175°C). Bake the bread for 35-40 minutes until golden brown on top and the internal temperature reaches 190°F (88°C). If the top browns too quickly, tent with aluminum foil halfway through baking.
- Immediately brush the hot bread with the optional glaze for a beautiful shine and extra flavor. Remove from the pan after 5 minutes and cool completely on a wire rack before slicing to allow the structure to set fully.
Notes
- Wait at least 1 hour before slicing to prevent the bread from becoming gummy.
- Store at room temperature in an airtight container for 3-4 days.
- For longer storage, slice the cooled bread and freeze with parchment paper between slices.
- Never refrigerate this bread as it will go stale faster.
- To refresh day-old bread, sprinkle with water and warm in a 300°F oven for 5-7 minutes.


