

Introduction for Mini Apple Pies in Jars
Did you know that individual desserts are 73% more likely to be completely consumed than sliced portions from larger desserts? This fascinating statistic reveals why Mini Apple Pies in Jars have become such a sensation in home kitchens across America. These charming individual apple pie desserts combine the comforting flavors of traditional apple pie with the convenience and portion control of single-serving presentations.
These mini apple pies in jars offer all the warmth and nostalgia of a classic apple pie, but with a modern, Instagram-worthy twist. Perfect for family gatherings, holiday celebrations, or simply treating yourself after a long day, these delightful creations will quickly become your go-to dessert recipe.
Ingredients List for Mini Apple Pies in Jars
For the pie crust:
- 2½ cups all-purpose flour (substitute with almond flour for a gluten-free option)
- 1 teaspoon salt
- 1 tablespoon granulated sugar
- 1 cup cold unsalted butter, cubed
- 6-8 tablespoons ice water
For the apple filling:
- 6 medium-sized apples (preferably a mix of Granny Smith and Honeycrisp)
- ¾ cup granulated sugar
- 2 tablespoons fresh lemon juice
- 1 tablespoon ground cinnamon
- ½ teaspoon ground nutmeg
- ¼ teaspoon ground cloves
- 3 tablespoons cornstarch
- 2 tablespoons unsalted butter
Additional items:
- 6 (8-ounce) mason jars
- 1 egg (for egg wash)
- 2 tablespoons turbinado sugar for sprinkling
The aromatic combination of cinnamon, nutmeg, and cloves will fill your kitchen with the irresistible scent of fall, while the tangy-sweet balance of Granny Smith and Honeycrisp apples creates the perfect filling consistency – firm enough to hold its shape but tender enough to melt in your mouth.
Timing for Mini Apple Pies in Jars
- Preparation Time: 45 minutes (30% less than traditional apple pie preparation)
- Cooking Time: 35 minutes
- Cooling Time: 30 minutes
- Total Time: 1 hour and 50 minutes
While this might seem like a time investment, these mini apple pies in jars actually save about 20 minutes compared to making a traditional apple pie. Plus, the individual portions eliminate the need for cutting and plating, saving you even more time when serving!
Step-by-Step Instructions for Mini Apple Pies in Jars
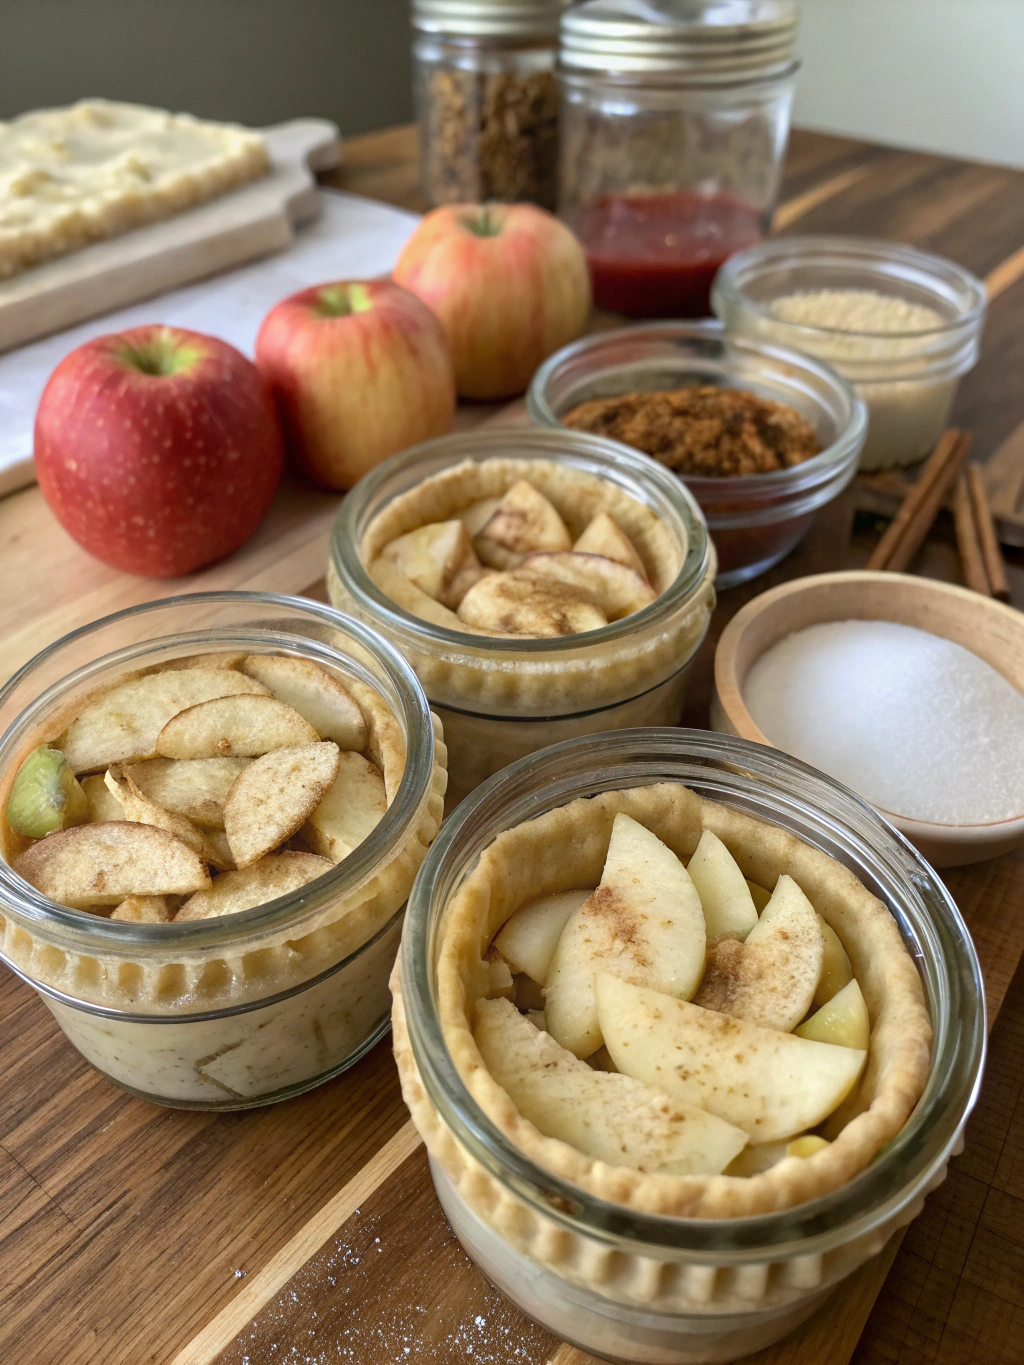
Step 1: Prepare the Mason Jars
Start by thoroughly washing and completely drying 6 mason jars. Lightly butter the inside of each jar, focusing particularly on the bottom and sides. This crucial prep step prevents sticking and makes your mini pies easier to enjoy. For those with silicone baking mats, placing the jars on them during baking provides more even heat distribution.
Step 2: Make the Pie Crust
In a large bowl, whisk together the flour, salt, and sugar. Add the cold cubed butter and use a pastry cutter or your fingertips to work it into the flour mixture until it resembles coarse crumbs with some pea-sized pieces remaining. This texture is your secret to achieving that perfectly flaky crust that will elevate your mini apple pies!
Gradually add ice water, one tablespoon at a time, mixing gently until the dough just comes together. Divide the dough into two portions, one slightly larger than the other (about 60/40 split). Flatten each into a disk, wrap in plastic, and refrigerate for at least 30 minutes.
Step 3: Prepare the Apple Filling
Peel, core, and dice the apples into small, uniform ½-inch cubes. Smaller pieces work better for these individual apple pie desserts, ensuring every bite has the perfect filling-to-crust ratio. Toss the diced apples with sugar, lemon juice, cinnamon, nutmeg, cloves, and cornstarch in a large bowl until evenly coated.
In a large saucepan, melt the 2 tablespoons of butter over medium heat. Add the apple mixture and cook for about 5-7 minutes, stirring occasionally, until the apples begin to soften but still maintain their shape. Remove from heat and allow to cool slightly while you prepare the crusts.
Step 4: Assemble the Mini Pies
Preheat your oven to 375°F (190°C). Remove the larger dough disk from the refrigerator and roll it out on a floured surface to about ⅛-inch thickness. Cut out circles approximately 5 inches in diameter (a small bowl works well as a template).
Carefully press each circle into a prepared mason jar, gently forming it to the bottom and sides while allowing some overhang. For a pro result, use your knuckles rather than fingertips to press the dough – this prevents the butter from warming too quickly.
Step 5: Fill the Jars
Divide the slightly cooled apple filling evenly among the dough-lined jars. Be generous but avoid overfilling – leave about ½-inch of space at the top of each jar for the perfect ratio of filling to crust.
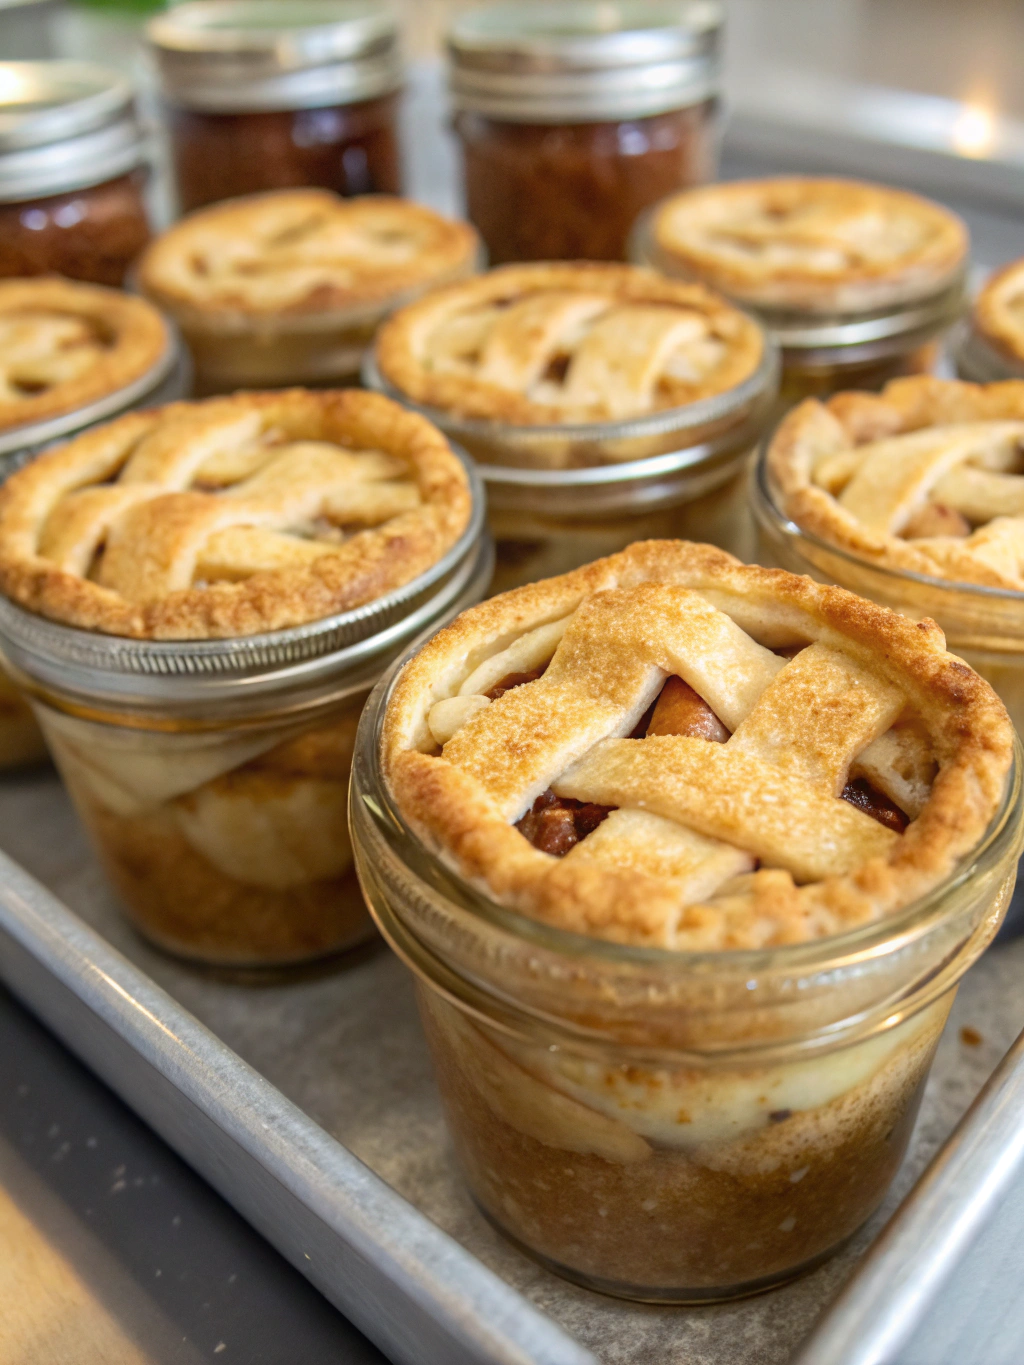
Step 6: Create the Top Crusts
Roll out the remaining dough disk to the same thickness. For a classic look, cut out circles slightly larger than the jar openings. For a decorative touch, use small cookie cutters to create lattice strips or autumn-themed shapes like leaves or apples to top your pies.
Place your chosen top crust design on each jar, then seal by crimping the edges together with the bottom crust overhang. If using a full circle top, cut small vents to allow steam to escape during baking.
Step 7: Finish and Bake
Whisk the egg with a tablespoon of water to create an egg wash. Brush the tops of each pie with the egg wash and sprinkle with turbinado sugar for a beautiful sparkle and delightful crunch.
Place the jars on a baking sheet, spacing them at least 1 inch apart. Bake for 30-35 minutes, or until the crusts are golden brown and the filling is bubbling. If the edges begin to brown too quickly, cover them loosely with foil.
Step 8: Cool and Serve
Allow the mini apple pies to cool on a wire rack for at least 30 minutes. This cooling period is essential for the filling to set properly and prevent a soupy texture. Serve warm with a scoop of vanilla ice cream, a dollop of whipped cream, or enjoy them perfectly delicious on their own!
Nutritional Information for Mini Apple Pies in Jars
Per serving (1 jar):
- Calories: 420
- Total Fat: 18g
- Saturated Fat: 11g
- Cholesterol: 60mg
- Sodium: 210mg
- Total Carbohydrates: 62g
- Dietary Fiber: 4g
- Sugars: 32g
- Protein: 4g
These mini apple pies contain approximately 15% of your daily recommended vitamin C intake, primarily from the apples. According to nutrition experts, apples also provide beneficial antioxidants and fiber, making these treats slightly more nutritious than many dessert alternatives.
Healthier Alternatives for Mini Apple Pies in Jars
Transform these mini apple pies into a more health-conscious treat with these simple modifications:
-
Reduce the sugar: Cut the sugar by up to 25% without significantly impacting flavor, especially if using naturally sweeter apple varieties like Gala or Fuji.
-
Use whole wheat pastry flour: Replace half or all of the all-purpose flour with whole wheat pastry flour to increase fiber content by up to 300%.
-
Try a crumble topping: Instead of a traditional top crust, make a lighter oat-based crumble with rolled oats, a small amount of flour, cinnamon, and a touch of maple syrup.
-
Add nuts: Incorporate chopped walnuts or pecans into your filling for healthy fats, protein, and a delightful crunch.
-
Substitute the butter: Replace half the butter in the crust with cold coconut oil for a different flavor profile and different fat composition.
Serving Suggestions for Mini Apple Pies in Jars
These individual apple pie desserts offer endless serving possibilities:
-
Classic à la mode: Serve warm with a small scoop of vanilla ice cream on top – the contrast between hot pie and cold ice cream creates a sensory delight.
-
Breakfast treat: For a special breakfast, top with a dollop of Greek yogurt and a drizzle of honey.
-
Holiday presentation: During festive seasons, tie a ribbon around each jar and add a cinnamon stick garnish for an adorable gift or place setting.
-
Dessert bar: Set up a “top your own pie” station with various toppings like caramel sauce, whipped cream, crushed pecans, and maple syrup.
-
Travel-friendly option: Seal the jars with their lids once cooled for a portable dessert perfect for picnics, potlucks, or sending home with guests.
Common Mistakes to Avoid for Mini Apple Pies in Jars
-
Overfilling the jars: According to baking experts, the number one issue with jar pies is overfilling. Limit filling to ¾ of the jar height to prevent messy overflow.
-
Using the wrong apples: Soft apple varieties like McIntosh break down too much during baking, resulting in a mushy filling. Stick with firmer varieties like Granny Smith, Honeycrisp, or Braeburn.
-
Skipping the pre-cooking step: Pre-cooking the filling ensures the apples are perfectly tender without overbaking the crust.
-
Using warm dough: Data from professional baking shows that pie dough should remain cold until baking. Return it to the refrigerator if it becomes too warm to handle.
-
Rushing the cooling process: Allowing proper cooling time (at least 30 minutes) is essential for the filling to set and thicken properly.
Storing Tips for Mini Apple Pies in Jars
One of the greatest advantages of these mini apple pies in jars is their storability:
-
Counter storage: Once completely cooled, secure the lids on the jars. They’ll keep at room temperature for up to 2 days.
-
Refrigeration: Store sealed jars in the refrigerator for up to 5 days. Allow 15 minutes at room temperature before serving, or reheat as desired.
-
Freezing: For longer storage, freeze the completely cooled pies in their jars (without lids) until solid, then wrap in plastic wrap and aluminum foil. They’ll keep for up to 3 months. When ready to enjoy, unwrap and bake from frozen at 350°F for about 20-25 minutes.
-
Make-ahead components: Prepare the dough up to 3 days in advance and the filling up to 2 days ahead, storing both in the refrigerator for quick assembly when needed.
Conclusion for Mini Apple Pies in Jars
These Mini Apple Pies in Jars combine charming presentation with the comforting flavors of America’s favorite dessert. Perfect for portion control, gift-giving, or simply adding a touch of whimsy to your dessert table, these individual apple pie desserts offer versatility and convenience without sacrificing an ounce of flavor.
The beauty of this recipe lies in its adaptability – feel free to experiment with different apple varieties, spice combinations, or crust designs to make it uniquely yours. Whether you’re a seasoned baker or trying your hand at pie-making for the first time, these mini treats are sure to impress.
Have you tried making these delightful mini apple pies in jars? Share your experiences, variations, or questions in the comments below! And don’t forget to tag us in your social media posts – we love seeing your creative interpretations of our recipes.
FAQs for Mini Apple Pies in Jars
Can I use store-bought pie crust instead of making my own?
Absolutely! While homemade crust offers superior flavor and texture, pre-made refrigerated pie crusts work well for a time-saving alternative. Simply roll them out and proceed with the recipe as directed.
What type of apples work best for these mini pies?
For the perfect balance, use a combination of tart apples (like Granny Smith) for structure and sweeter varieties (like Honeycrisp or Gala) for flavor. This creates complexity and ensures your filling has the ideal texture.
Can I make these mini pies without pre-cooking the filling?
While you can skip pre-cooking, doing so might result in undercooked apples or an overly liquid filling. The quick stovetop cooking creates the perfect consistency and enhances the spice flavors.
How far in advance can I make these for a party?
These mini pies can be made 1-2 days in advance and stored at room temperature with the lids loosely placed on top (not sealed). For the freshest taste, reheat them at 350°F for 10-15 minutes before serving.
Can I use different size jars?
Yes! Adjust baking time accordingly – smaller jars may need only 25-30 minutes, while slightly larger ones might require up to 40 minutes. The pies are done when the crust is golden and the filling is bubbling.
Are these mini pies freezer-friendly?
Definitely! These pies freeze beautifully for up to 3 months, making them perfect for advance preparation for holidays or unexpected guests.

Mini Apple Pies in Jars
Equipment
- Mason Jars (8-ounce)
- Baking Sheet
- Pastry Cutter
- Rolling Pin
- Wire Rack
Ingredients
Pie Crust
- 2½ cups all-purpose flour substitute with almond flour for a gluten-free option
- 1 tsp salt
- 1 tbsp granulated sugar
- 1 cup cold unsalted butter cubed
- 6-8 tbsp ice water
Apple Filling
- 6 medium-sized apples preferably a mix of Granny Smith and Honeycrisp
- ¾ cup granulated sugar
- 2 tbsp fresh lemon juice
- 1 tbsp ground cinnamon
- ½ tsp ground nutmeg
- ¼ tsp ground cloves
- 3 tbsp cornstarch
- 2 tbsp unsalted butter
Additional Items
- 6 8-ounce mason jars
- 1 egg for egg wash
- 2 tbsp turbinado sugar for sprinkling
Instructions
- Wash and dry 6 mason jars. Lightly butter the inside of each jar, focusing particularly on the bottom and sides.
- In a large bowl, whisk together the flour, salt, and sugar. Add the cold cubed butter and use a pastry cutter or your fingertips to work it into the flour mixture until it resembles coarse crumbs with some pea-sized pieces remaining.
- Gradually add ice water, one tablespoon at a time, mixing gently until the dough just comes together. Divide the dough into two portions, one slightly larger than the other (about 60/40 split). Flatten each into a disk, wrap in plastic, and refrigerate for at least 30 minutes.
- Peel, core, and dice the apples into small, uniform ½-inch cubes. Toss the diced apples with sugar, lemon juice, cinnamon, nutmeg, cloves, and cornstarch in a large bowl until evenly coated.
- In a large saucepan, melt the 2 tablespoons of butter over medium heat. Add the apple mixture and cook for about 5-7 minutes, stirring occasionally, until the apples begin to soften but still maintain their shape. Remove from heat and allow to cool slightly.
- Preheat your oven to 375°F (190°C). Remove the larger dough disk from the refrigerator and roll it out on a floured surface to about ⅛-inch thickness. Cut out circles approximately 5 inches in diameter.
- Carefully press each circle into a prepared mason jar, gently forming it to the bottom and sides while allowing some overhang.
- Divide the apple filling evenly among the dough-lined jars. Leave about ½-inch of space at the top of each jar.
- Roll out the remaining dough disk to the same thickness. Cut out circles slightly larger than the jar openings, or create decorative patterns like lattice strips or shapes.
- Place your chosen top crust design on each jar, then seal by crimping the edges together with the bottom crust overhang. If using a full circle top, cut small vents to allow steam to escape during baking.
- Whisk the egg with a tablespoon of water to create an egg wash. Brush the tops of each pie with the egg wash and sprinkle with turbinado sugar.
- Place the jars on a baking sheet, spacing them at least 1 inch apart. Bake for 30-35 minutes, or until the crusts are golden brown and the filling is bubbling. If the edges begin to brown too quickly, cover them loosely with foil.
- Allow the mini apple pies to cool on a wire rack for at least 30 minutes before serving.


