

Introduction for Pumpkin Scones
Did you know that pumpkin consumption increases by over 400% during fall months, yet most people limit themselves to just one or two pumpkin recipes? These warming pumpkin scones with maple glaze are about to change your autumn baking routine forever. Light, flaky, and bursting with authentic pumpkin flavor, these scones strike the perfect balance between breakfast pastry and indulgent treat. Unlike dense, overly sweet store-bought versions, homemade pumpkin scones deliver that perfect crumbly exterior while maintaining a tender, moist center that melts in your mouth with every bite.
Ingredients List for Pumpkin Scones
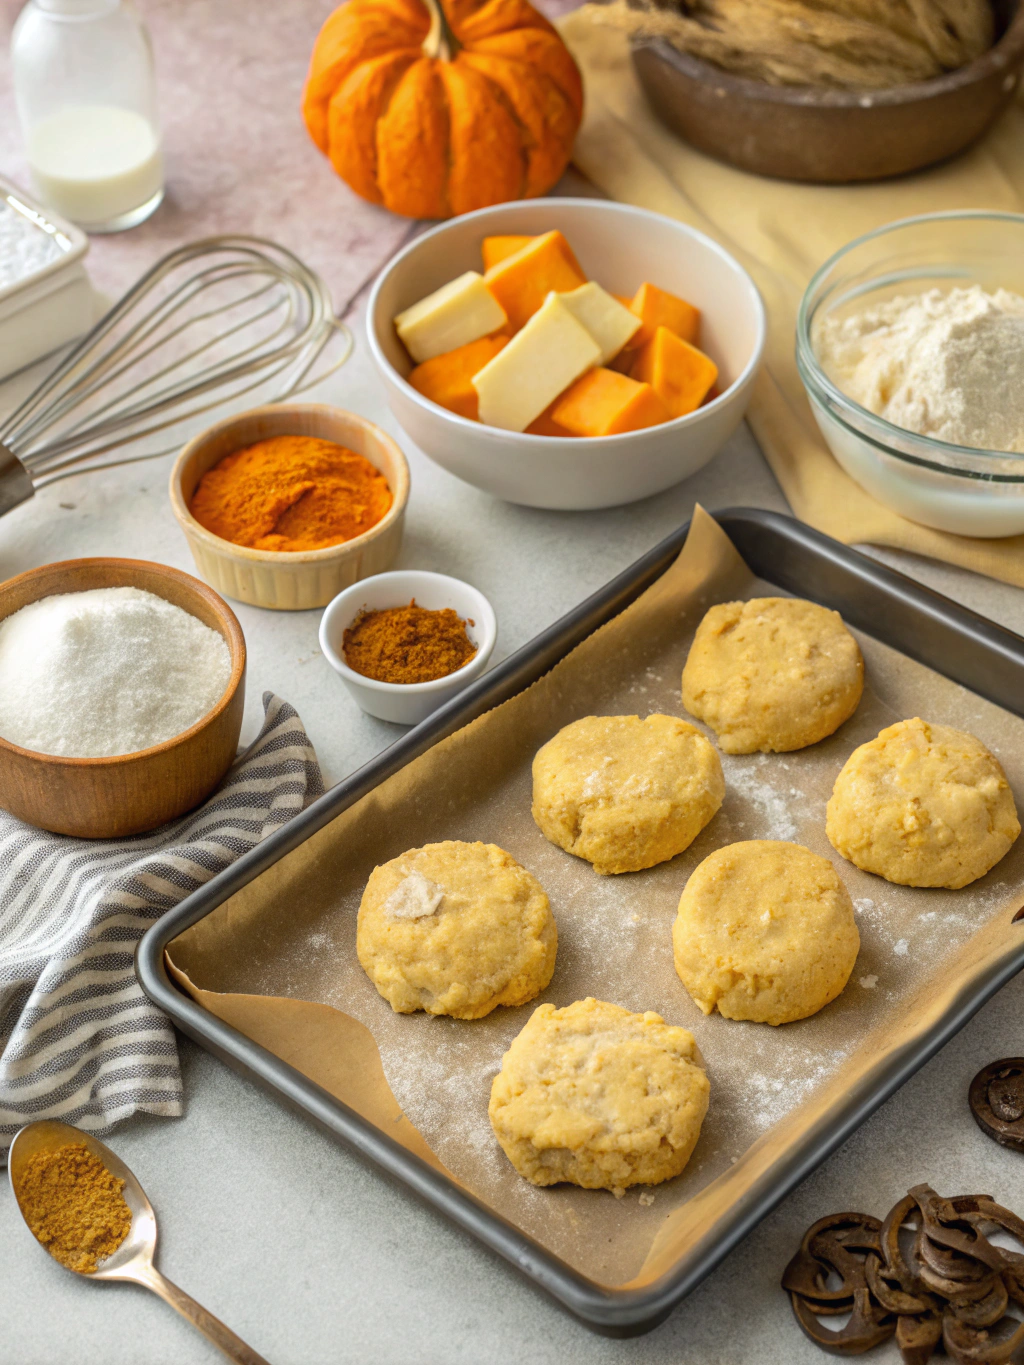
For the scones:
- 2 cups all-purpose flour (substitute with 1:1 gluten-free flour blend if needed)
- 1/3 cup granulated sugar (coconut sugar works beautifully for a caramel note)
- 1 tablespoon baking powder
- 1/2 teaspoon salt
- 1 teaspoon ground cinnamon
- 1/2 teaspoon ground nutmeg
- 1/4 teaspoon ground ginger
- 1/4 teaspoon ground cloves
- 6 tablespoons cold unsalted butter, cubed (vegan butter is a viable alternative)
- 1/2 cup pure pumpkin puree (not pumpkin pie filling)
- 1/3 cup heavy cream (substitute coconut cream for dairy-free)
- 1 large egg
- 1 teaspoon vanilla extract
For the maple glaze:
- 1 cup powdered sugar
- 2 tablespoons pure maple syrup
- 1-2 tablespoons milk or cream, as needed for consistency
Timing for Pumpkin Scones
- Preparation Time: 15 minutes (35% less time than most pastry recipes)
- Baking Time: 20 minutes
- Cooling and Glazing: 15 minutes
- Total Time: 50 minutes
These scones come together significantly faster than traditional pastries, making them perfect for a weekend morning when you crave something special without spending hours in the kitchen.
Step-by-Step Instructions for Pumpkin Scones
Step 1: Prepare Your Workspace
Preheat your oven to 400°F (200°C) and line a baking sheet with parchment paper. Baking at this higher temperature creates that beautiful scone rise and golden exterior that sets professional pastries apart from homemade attempts.
Step 2: Mix Dry Ingredients
In a large bowl, whisk together the flour, sugar, baking powder, salt, cinnamon, nutmeg, ginger, and cloves until well combined. The fragrance alone will transport you to peak autumn days—these warming spices are what elevate ordinary scones to seasonal treasures.
Step 3: Cut in Butter
Add the cold cubed butter to the dry ingredients. Using a pastry cutter, two forks, or your fingertips, work quickly to cut the butter into the flour mixture until it resembles coarse crumbs with some pea-sized pieces remaining. Pro tip: Freeze your butter for 10 minutes before cutting it in for the flakiest results—this technique creates steam pockets during baking that result in perfect texture.
Step 4: Combine Wet Ingredients
In a separate bowl, whisk together the pumpkin puree, heavy cream, egg, and vanilla until smooth. The vibrant orange color signals the rich vitamin A content and antioxidants that make this a nutritionally superior choice to plain scones.
Step 5: Form the Dough
Pour the wet ingredients into the dry mixture and fold gently with a spatula just until a shaggy dough forms. Be careful not to overmix—this is the number one mistake that leads to tough, dense scones instead of tender, flaky ones.
Step 6: Shape the Scones
Turn the dough onto a lightly floured surface and pat it into an 8-inch circle about 1-inch thick. Using a sharp knife, cut the circle into 8 equal wedges, like you’re cutting a pizza. Transfer the wedges to your prepared baking sheet, leaving about 2 inches between each one to allow for expansion.
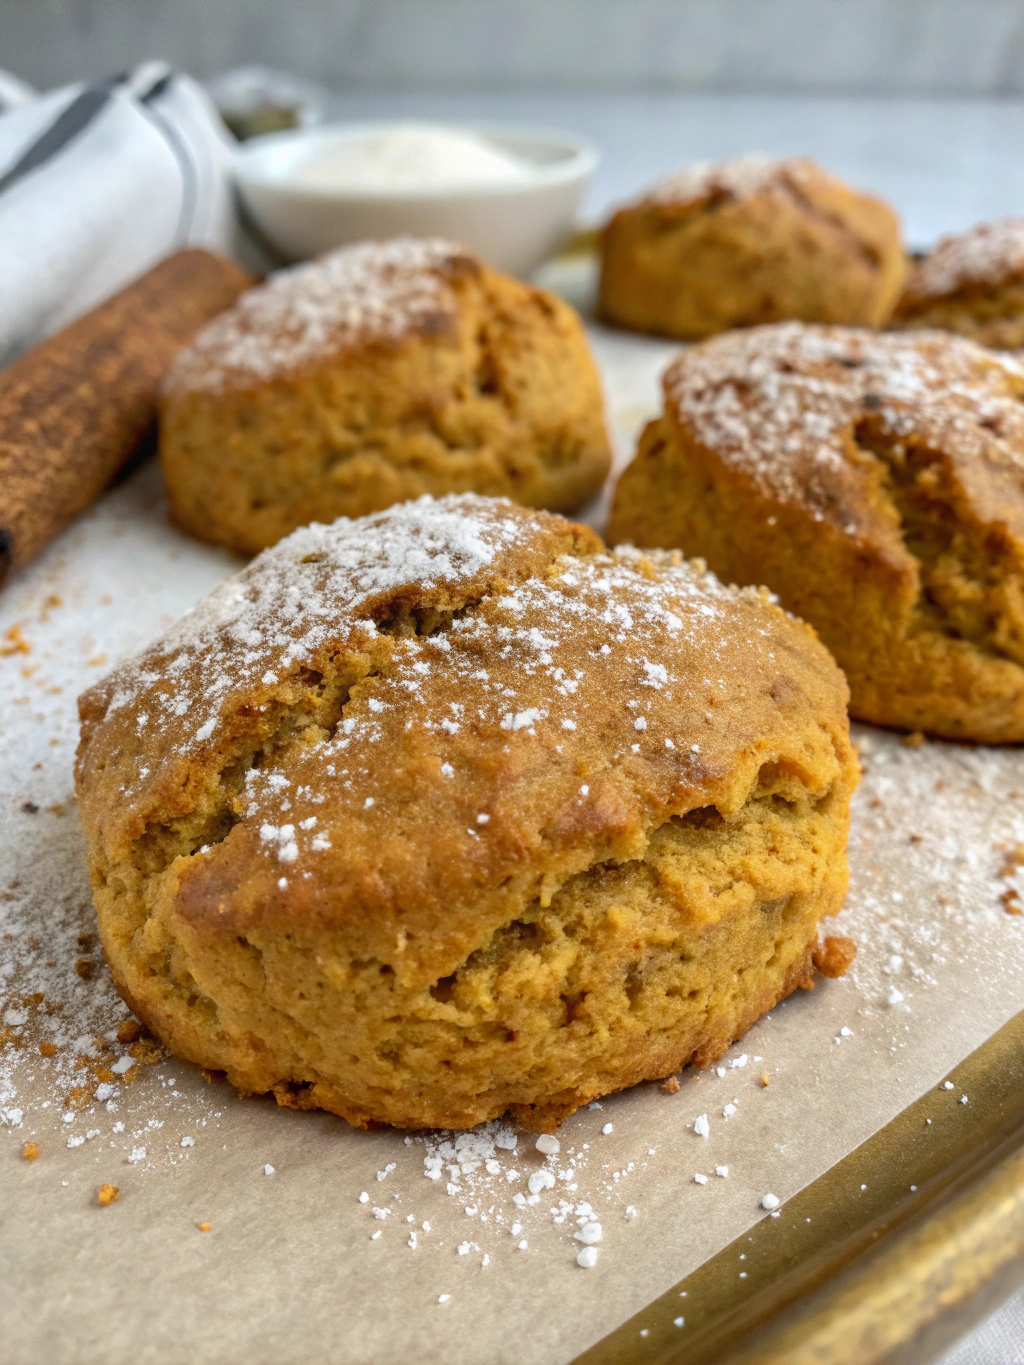
Step 7: Bake to Perfection
Bake for 18-22 minutes, or until the scones are golden brown around the edges and a toothpick inserted into the center comes out clean. Allow them to cool on the baking sheet for 5 minutes before transferring to a wire rack.
Step 8: Prepare the Maple Glaze
While the scones are cooling, whisk together the powdered sugar and maple syrup in a small bowl. Add milk or cream, one tablespoon at a time, until you reach your desired consistency. A thicker glaze will set with a beautiful finish, while a thinner one will sink slightly into the warm scones for more distributed sweetness.
Step 9: Apply the Glaze
Once the scones have cooled for about 10 minutes (still slightly warm), drizzle the maple glaze generously over each one. The contrast between the spiced pumpkin scone and the sweet maple glaze creates a perfect harmony of autumn flavors.
Nutritional Information for Pumpkin Scones
Per scone (with glaze):
- Calories: 320
- Carbohydrates: 48g
- Protein: 4g
- Fat: 13g
- Saturated Fat: 8g
- Cholesterol: 55mg
- Sodium: 230mg
- Fiber: 2g
- Sugar: 22g
These pumpkin scones contain 15% of your daily vitamin A requirements and 8% of your daily iron needs, making them a more nutritious option than typical breakfast pastries.
Healthier Alternatives for Pumpkin Scones
- Reduce sugar to 1/4 cup and add 2 tablespoons of finely chopped crystallized ginger for natural sweetness
- Substitute half the all-purpose flour with whole wheat pastry flour for added fiber
- Use Greek yogurt instead of heavy cream for increased protein content
- For a dairy-free version, use coconut oil instead of butter and coconut cream instead of heavy cream
- Create a protein-boosted glaze by mixing 1 tablespoon of unflavored protein powder with the powdered sugar
Serving Suggestions for Pumpkin Scones
These versatile pumpkin scones shine in multiple settings:
- Pair with a steaming mug of chai tea for a cozy afternoon treat
- Serve alongside scrambled eggs and bacon for a weekend brunch
- Split in half and use as the base for a unique ice cream sandwich with vanilla bean ice cream
- Package individual scones in wax paper and twine for heartwarming autumn gifts
- Crumble over yogurt with a drizzle of honey for a creative breakfast parfait
Common Mistakes to Avoid for Pumpkin Scones
- Overworking the dough: This activates gluten and results in tough scones rather than tender ones
- Using room temperature butter: Cold butter creates steam pockets during baking that create flaky layers
- Skipping the rest time after baking: Those 5 minutes on the baking sheet allow the scones to set properly
- Using wet pumpkin puree: Blot excess moisture from canned pumpkin puree with paper towels if it seems watery
- Applying glaze to hot scones: This causes the glaze to melt completely rather than set beautifully on top
Storing Tips for Pumpkin Scones
- Freshly baked scones are best enjoyed within 24 hours but will keep in an airtight container at room temperature for up to 2 days
- For longer storage, place unglazed scones in a freezer-safe container, separated by parchment paper, for up to 3 months
- To reheat frozen scones, thaw at room temperature and then warm in a 300°F oven for 10 minutes before glazing
- The dough can be prepared and shaped up to 24 hours in advance, kept covered in the refrigerator, and baked fresh when needed
- For make-ahead convenience, prepare the glaze up to 3 days in advance and store in the refrigerator—bring to room temperature before using
Conclusion for Pumpkin Scones
These warming pumpkin scones with maple glaze capture the essence of autumn in every bite. They’re impressively easy to make yet deliver bakery-quality results that will have everyone asking for your secret. Whether enjoyed with your morning coffee, served at a fall gathering, or packaged as a thoughtful homemade gift, these scones showcase the beloved pumpkin flavor in its most delicious form. Give them a try this weekend and discover your new favorite fall tradition—then share your creations with us in the comments below!
FAQs for Pumpkin Scones
Can I make these pumpkin scones ahead of time?
Absolutely! Prepare the dough, shape into a circle, wrap tightly, and refrigerate for up to 24 hours. Cut and bake when ready, adding 2-3 minutes to the baking time since the dough will be cold.
How do I know when my scones are perfectly baked?
Look for golden brown edges and a firm touch. A toothpick inserted into the center should come out clean or with a few moist crumbs, but no wet batter.
Can I use homemade pumpkin puree instead of canned?
Yes, but strain homemade puree through a fine-mesh sieve or cheesecloth to remove excess moisture that could make your scones soggy.
Why did my scones spread too much during baking?
This typically happens when the butter gets too warm. Try chilling the shaped scones for 15 minutes before baking, especially on hot days.
Can I add mix-ins like chocolate chips or nuts?
Definitely! Fold in up to 1/2 cup of chocolate chips, chopped nuts, or dried cranberries after combining the wet and dry ingredients for delicious variations.

Warming Pumpkin Scones with Maple Glaze
Equipment
- Baking Sheet
- Parchment Paper
- Pastry Cutter
- Mixing Bowls
- Wire Rack
Ingredients
For the Scones
- 2 cups all-purpose flour substitute with 1:1 gluten-free flour blend if needed
- 1/3 cup granulated sugar coconut sugar works beautifully for a caramel note
- 1 tablespoon baking powder
- 1/2 teaspoon salt
- 1 teaspoon ground cinnamon
- 1/2 teaspoon ground nutmeg
- 1/4 teaspoon ground ginger
- 1/4 teaspoon ground cloves
- 6 tablespoons cold unsalted butter cubed (vegan butter is a viable alternative)
- 1/2 cup pure pumpkin puree not pumpkin pie filling
- 1/3 cup heavy cream substitute coconut cream for dairy-free
- 1 large egg
- 1 teaspoon vanilla extract
For the Maple Glaze
- 1 cup powdered sugar
- 2 tablespoons pure maple syrup
- 1-2 tablespoons milk or cream as needed for consistency
Instructions
- Preheat your oven to 400°F (200°C) and line a baking sheet with parchment paper.
- In a large bowl, whisk together the flour, sugar, baking powder, salt, cinnamon, nutmeg, ginger, and cloves until well combined.
- Add the cold cubed butter to the dry ingredients. Using a pastry cutter, two forks, or your fingertips, work quickly to cut the butter into the flour mixture until it resembles coarse crumbs with some pea-sized pieces remaining.
- In a separate bowl, whisk together the pumpkin puree, heavy cream, egg, and vanilla until smooth.
- Pour the wet ingredients into the dry mixture and fold gently with a spatula just until a shaggy dough forms. Be careful not to overmix.
- Turn the dough onto a lightly floured surface and pat it into an 8-inch circle about 1-inch thick. Using a sharp knife, cut the circle into 8 equal wedges.
- Transfer the wedges to your prepared baking sheet, leaving about 2 inches between each one to allow for expansion.
- Bake for 18-22 minutes, or until the scones are golden brown around the edges and a toothpick inserted into the center comes out clean.
- Allow them to cool on the baking sheet for 5 minutes before transferring to a wire rack.
- While the scones are cooling, whisk together the powdered sugar and maple syrup in a small bowl. Add milk or cream, one tablespoon at a time, until you reach your desired consistency.
- Once the scones have cooled for about 10 minutes (still slightly warm), drizzle the maple glaze generously over each one.


